I’m a Google Cloud Development Relations Engineer, which means I should help people use our cloud to solve their problems. But I’ve been away from work most of the year up to now; first due to a lot of sick days then a six month disability leave when I realized I had a serious heart condition requiring lots of attention. I’m healed up now and back to work, and… what is this? A ton of AI stuff to catch up on for me.
It occurs to me that this is a chance to share how I’m learning this stuff from scratch. Based on the documentation I’ve been using, such a perspective may be valuable to a lot of people. It sometimes seems like everything I read about generative AI assumes I already understand 90% of the field and am just adding the last 10%. Well, I currently understand close to 0% of the field, and have to start by learning the first 10%.
So here’s an easy exercise I just did: write a gen AI chat bot using Google Cloud’s AI services.
What? Everybody does that! Who needs another one?
Nobody. Nobody needs another gen AI chat bot. But the first step into a new field is usually the hardest, so let’s take the smallest, easiest step I could find. A chat bot it is.
If you wish to make an apple pie from scratch, you must first invent the universe
But creating a new solution on Google Cloud is a lot easier because almost all of the prerequisites are already provided for you. So you will start by creating a Google Cloud project and enabling billing for it.
- First, go to console.cloud.google.com. You will have to sign in with a Google account. This can be a regular GMail account or a GSuite account (such as your school’s or company’s email account). However, a GSuite administrator can restrict your access to Google Cloud, so unless this experiment is for work or class, use a GMail account. You can get one for free if you need to.
- If you’ve never used Google Cloud with this account you may be offered $300 in free credits for 90 days. You’ll still need to add a payment method, but it won’t be charged until the free trial is over (in 90 days or $300, whichever comes first). Even then, it won’t be charged until you agree at that time.
- Create a project. There’s a drop-down at the top of the page that may say Select project, or one may already be selected, but create a new one for trying this out. That way, when you’re done, you can delete the whole project and be sure nothing that can incur charges will live on. Click the drop-down then the link for NEW PROJECT. I’m calling mine Simple AI Chatbot. Here’s what it looks like to create that:
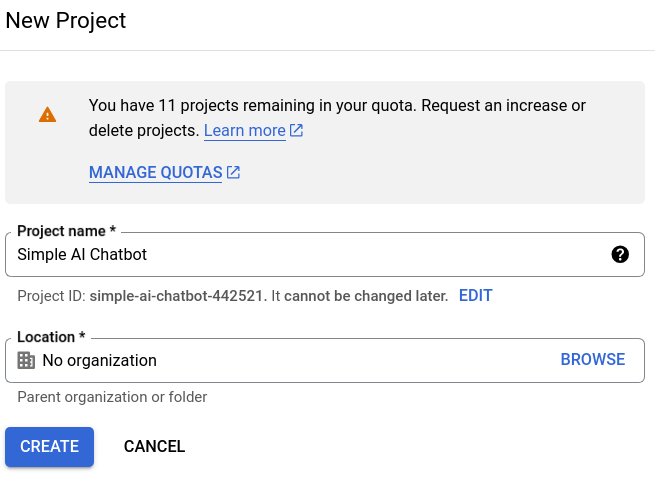
- You notice that the Project ID is created from the name I entered, but altered to be globally unique. So when I need to refer to the project’s ID, I’ll use
simple-ai-chatbot-441521. Press Create, wait a few seconds for the project to be created, then return to that project selector drop down and select your new project.
Your first step is done.
Create a Python programming environment
This example is in Python. Parts of it would be straightforward to do in other languages with the equivalent Google Cloud libraries, but to get to the end of this one you’ll need to use Python.
- Open a command shell/terminal/prompt that you can type commands into. Note that you can use the free Cloud Shell for this, which I recommend. To open that, click the icon that looks a little like a command prompt in the upper right corner of your Console page:

- The basic tools you’ll need are already installed in Cloud Shell for you. If you are using your own local machine shell, you’ll need to install Python 3 and the Google Cloud CLI. You’ll also need to authenticate to the cloud with the command
gcloud auth login. - Create a new folder, change to it, and create a virtual Python environment with
python3 -mvenv env. - Activate the virtual Python environment. You’ll have to do this every time you restart the shell. For Windows, the command is
env/Scripts/activate. For other environments it’ssource env/bin/activate.
When the virtual Python environment is active, changes you make to the Python installation will only affect it, and not other environments you may be using for other projects.
Install Python packages
You will install three Python packages (programming libraries). The first is for connecting to Google Cloud’s Vertex AI service, which will handling answering questions from users. The second is for gradio, a really handy package for building web chat bots in Python. And the third is for Jupyter, an enhanced Python interactive shell and interactive notebook host:
pip install google-cloud-aiplatform
pip install gradio
pip install jupyter
Write a Python code fragment to talk to Vertex AI
First, set the project ID you’ll be using with Google Cloud libraries, as below. Use your own project ID instead of the one shown here.
gcloud config set project simple-ai-chatbot-442521You may have to click on a pop-up or follow a link and instructions for this step.
Now, open up the Jupyter interactive Python command line and enter the following lines:
jupyter console
In [1]: import vertexai
In [2]: from vertexai-generative_models import GenerativeModel
In [3]: model = GenerativeModel("gemini-1.5-flash")
In [4]: prompt = "Can I drive from Seattle to London?"
In [5]: result = model.generate_content([prompt])
In [6]: result
You should see something like the following (but you probably won’t at first – see the later text for why and how to fix):
candidates {
  content {
    role: "model"
    parts {
      text: "No, you cannot drive from Seattle to London.  \n\n* **Geography:** Seattle is in the United States, and London is in the United Kingdom. They are separated by the Atlantic Ocean.\n* **Transportation:**  You would need to take a plane or ship to cross the ocean. \n\nWhile it\'s fun to imagine driving across the world, it\'s not physically possible! \n"
    }
  }
  finish_reason: STOP
  safety_ratings {
    category: HARM_CATEGORY_HATE_SPEECH
    probability: NEGLIGIBLE
    probability_score: 0.0693359375
    severity: HARM_SEVERITY_NEGLIGIBLE
    severity_score: 0.0356445312
  }
  safety_ratings {
    category: HARM_CATEGORY_DANGEROUS_CONTENT
    probability: NEGLIGIBLE
    probability_score: 0.248046875
    severity: HARM_SEVERITY_NEGLIGIBLE
    severity_score: 0.0756835938
  }
  safety_ratings {
    category: HARM_CATEGORY_HARASSMENT
    probability: NEGLIGIBLE
    probability_score: 0.138671875
    severity: HARM_SEVERITY_NEGLIGIBLE
    severity_score: 0.0466308594
  }
  safety_ratings {
    category: HARM_CATEGORY_SEXUALLY_EXPLICIT
    probability: NEGLIGIBLE
    probability_score: 0.099609375
    severity: HARM_SEVERITY_NEGLIGIBLE
    severity_score: 0.0502929688
  }
  avg_logprobs: -0.2477687277444979
}
usage_metadata {
  prompt_token_count: 8
  candidates_token_count: 82
  total_token_count: 90
}
model_version: "gemini-1.5-flash-001"
candidates {
  content {
    role: "model"
    parts {
      text: "No, you cannot drive directly from Seattle to London.  They are separated by the Atlantic Ocean.\n"
    }
  }
  finish_reason: STOP
  avg_logprobs: -0.04128225644429525
}
usage_metadata {
  prompt_token_count: 8
  candidates_token_count: 21
  total_token_count: 29
}
model_version: "gemini-1.5-flash-002"
Why won’t might you not see this? Because some of the steps might have an error due to necessary APIs not being enabled by default. In particular, steps 3 and 5 might generate long, likely confusing, error messages. But somewhere near the ends of those messages there will be text similar to [some] API has not been used in project [project ID] before or it is disabled. Enable it by visiting [url] then retry. Go to that URL, click Enable to enable the needed API, then use the up-arrow key to re-enter and retry the failed command.
The final step (In [6]:) just displays the value of the result of the function call. By examining the structure you can see how to retrieve and print the actual answer.
In [7]: print(result.candidates[0].content.parts[0].text)No, you cannot drive from Seattle to London.
* **Geography:** Seattle is in the United States, and London is in the United Kingdom. They are separated by the Atlantic Ocean.
* **Transportation:** You would need to take a plane or ship to cross the ocean.
While it's fun to imagine driving across the world, it's not physically possible!The Gemini model responses may include markdown formatting, as shown here. When displayed using a markdown-aware environment, such as the WordPress one I’m using here, they’re easier to read:
No, you cannot drive from Seattle to London.
- Geography: Seattle is in the United States, and London is in the United Kingdom. They are separated by the Atlantic Ocean.
- Transportation: You would need to take a plane or ship to cross the ocean.
While it’s fun to imagine driving across the world, it’s not physically possible!
Well, there goes my vacation plan. Maybe I’ll drive to Tokyo instead.
Enter the command quit to exit the Jupyter console.
Create the web chat bot app
Use a code editor to create the file main.py to hold your application. Cloud shell has a built-in editor that you can invoke by clicking the pencil icon at the top right of the page:
Enter the following program using the editor:
import gradio
import vertexai

from vertexai.generative_models import GenerativeModel
model = GenerativeModel("gemini-1.5-flash")

def ask(question):
    response = model.generate_content([question])
    answer = response.candidates[0].content.parts[0].text
    return answer

bot = gradio.Interface(fn=ask, inputs=["text"], outputs=["text]")
bot.launch()
You’ve already seen most of this code in the earlier fragment. The ask function just submits the provided question and returns the text portion of the response. The actual web app is built by importing the gradio module at the top. Its behavior is defined in the second to last line (show one input to receive text, and one output to display text, and use the ask function to take the input and return the output). And the web app is run with the bot.launch() line at the end.
Save the file, then run the command python main.py. You should see a message that the app is running on a local URL. Click that URL and you should see a web page you can enter a question in. Type a question, then either Enter or click Submit, and view the response:

Aw, man, I can’t go anywhere!
Kill the chat bot server app by hitting Ctrl-C in the command shell.
Clean up
Most of what you’ve done for this exercise will incur few, if any charges. But making queries to Vertex AI might. If you don’t want that happening, shut down the entire project you created, which I strongly recommend for any project you experiment with. Once the project is shut down, all charges stop. No surprise bills will ever show up. Putting all your cloud resources into projects is one of Google Cloud’s best, and often unheralded, features. Shut down the project and don’t ever worry about it again!
Goodbye for now
For such a simple exercise this turned out to be a surprisingly long post. I hope you found it useful, and a starting point for trying other things in Google Cloud, and/or Google Cloud AI. Let me know in the comments; if there’s interest, I’ll try to keep doing this. Thanks for your attention.
